Showing posts with label savory. Show all posts

Friday, January 7, 2011

Mexican Lasagna

When Winter rolls around, all I feel like eating is comforting casseroles and warming dishes. Now, I know that after the sweet treats and decadent meals of the Holiday season, many people tend to look for low-fat, healthy salad recipes but with three kids to feed, salad ain't cuttin' it around here! You can serve this fantastic lasagna with a side salad though, you know, to lighten the guilt factor. This dish was such a hit, we all looked forward to having it for lunch the next day, which is saying a lot! I have a feeling this is one of those recipes that will be on permanent rotation on my meal plans!


Mexican Lasagna

1 1/2 lbs lean ground beef

1 green bell pepper, diced

1 onion, chopped

2 cloves of garlic, minced

1-28 oz can of diced tomatoes (don't drain it)
1 packet of taco spices (I use the low salt kind)
1 to 2 tsp Chipotle chili powder

1-12 oz can of corn kernels, drained (or use frozen)

1-19 oz can of red kidney beans, drained and rinsed

1 tbsp cornstarch (optional)
9 large flour tortillas

2 cups of sharp cheddar cheese, grated (or TexMex blend, or Monterey Jack)


Lightly grease a 9x13 inch baking dish; set aside.

In a dutch oven, brown ground beef until no longer pink. Drain off all fat and transfer to a heat proof bowl. In the same dutch oven, heat a tablespoon or two of olive oil and sauté bell pepper, onion and garlic until onion is translucent. Put the ground beef back in the pot and also add the tomatoes, taco spices and chili powder. Mix well then add the corn and the red kidney beans and mix again. Let simmer for a few minutes. If you find that your "chili" is a bit watery, make a slurry of a tbsp of cornstarch with some cold water and add it to the pot. Let it simmer a little and it should thicken up enough not to water down your lasagna.


Preheat your oven to 375F.


Ladle a little bit of chili on the bottom of your prepared baking dish. Cover with 3 of the tortillas, overlapping them to fit the dish. Ladle a third of your chili over the tortillas, sprinkle with a third of the cheese and cover with 3 more tortillas. Layer the ingredients that way, ending with the cheese on top of the casserole.


Bake for 35 to 40 minutes, until the filling is bubbly and the cheese is nicely browned. To further brown the cheese, broil the casserole for about 1 minute. Let the casserole stand for 5 minutes before serving.


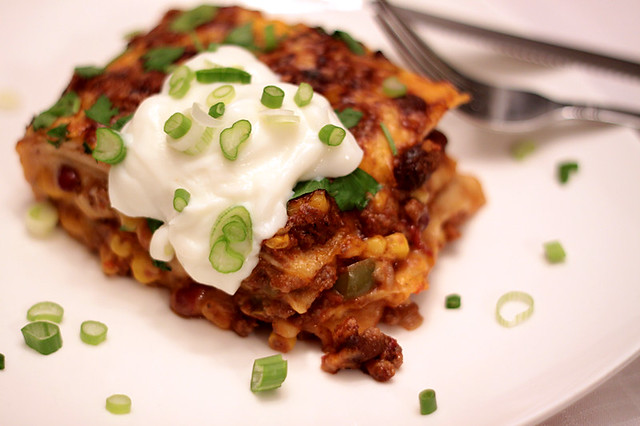
Serve with sour cream, chopped green onions and a salad.
Pin It!

Thursday, October 7, 2010

Giveaway!!! (and a Savory Muffin Recipe)

EDIT: Giveaway is now closed! Thanks for your comments, winner will be announced shortly!

Do you guys remember that great website I talked about a few weeks ago? You know, the one with everything from bed sets to wine glasses to coffee grinders? That's right,
CSN Stores! Do you also remember I told you I was going to host a giveaway sponsored by CSN Stores? Well, today's the day!!! Aren't you guys lucky you know me?

Alright, so one lucky Canadian or US resident (sorry, dear international readers!) is going to win a 125$, yes you read right, 125$ gift certificate (cannot be used on shipping or international costs) to be used on ANY of CSN's stores! Imagine what you could get with 125$ and all that choice! Too many exclamation marks, I know I'm just too excited. Way too much excitement for me since last week, whew!

To enter the giveaway, leave a comment on this post. It's that easy! And for a bonus entry, you can "like" And then I do the Dishes on Facebook! Did I mention I have a Facebook page now? No? Well, look at the right column and you'll see a nice little box where you can "like" And then I do the Dishes. Then, come back and leave another comment telling me the name you use on Facebook so I can check you really "liked" the page. To be fair, I really will have to check. So be nice! You'll have until Thursday October 14th, 2010 at midnight (Daylight Savings Time) to enter the giveaway. Winner will then be chosen at random and will be announced on Friday October 15th, 2010.


Since I didn't include a recipe in my previous post, I just had to share one with you today. It has nothing to do with the giveaway, I just love these little Savory Muffins! I hope you enjoy them too!

Savory Muffins

These can be endlessly adapted with the ingredients of your choice. Change the cheese, use cooked chicken instead of ham, thyme instead of basil; use your favorite ingredients.

1 1/2 cups (215g) all-purpose flour
1/2 cup (65g) whole wheat flour
1 tbsp (10g) baking powder
1 tsp (5g) kosher salt
1/2 tsp (3g)baking soda
Freshly ground black pepper
1 cup (130g) Mamirolle cheese, cubed
1 tbsp fresh basil, chopped
2 eggs
3 tbsp olive oil, or the oil the sun-dried tomatoes were packed in
1 cup (300g) fat free sour cream
1/4 cup (40g) oil packed sun-dried tomatoes, finely chopped
1/2 cup (75g) Black Forest Ham, chopped small

Preheat your oven to 400F. Butter a 12-cup muffin tin or line with paper cups and set aside.
In a large bowl, whisk together the all-purpose flour, whole wheat flour, baking powder, baking soda, salt and pepper. Add the cubed cheese and chopped fresh basil and toss to coat; set aside.

In another bowl, mix together the eggs, oil and sour cream. Pour over the dry ingredients, mix lightly, then fold in the sun-dried tomatoes and the ham. Don't over mix.
Spoon the batter into your prepared muffin tin and bake in preheated oven for about 20 minutes or until a toothpick inserted in the center of the muffins comes out clean. Let the muffins cool in the tin for about 5 minutes then invert onto a wire rack to cool completely.

These are wonderful served with a salad or with crudités for a light lunch.


Giveaway Details Recap: Giveaway open to US and Canadian residents only. The prize, consisting of a 125$ gift certificate is provided by CSN Stores and cannot be used to pay for shipping or international charges. Contest is open from Thursday October 7th, 2010 until Thursday October 14th, 2010 (Midnight DST).
Pin It!

Thursday, August 26, 2010

Margherita Burgers Recipe and a Review to Come

As I mentionned briefly in a previous post, we've been changing things around the apartment lately: cleaning, painting and searching for some new furniture. I've been looking for inspiration pretty much everywhere I can find it. From kitchen tables to window treatments and wall hangings, I've been Googling like crazy!
One site that has it all is CSN Stores and I've been given the opportunity to review their services and products. I'm not kidding when I say they have everything, have a look for yourselves! So, please stay tuned for more in the coming weeks!
While we have been working pretty hard on making our apartment feel a little cozier, we've also been trying to take advantage of what's left of Summer vacation. The kids start school in less than a week now and it seems like just yesterday we were so happy that Summer was finally here! It has been a little cooler lately and I've been trying to use up those herbs I have growing on the porch. My favorite is basil, I could use it in just about anything, and most often I end up putting a big handful in my burgers. A few weeks ago I "invented" this burger recipe and I've made it at least 3 times since! The burgers are juicy and flavorful and yes, they taste like Summer!


Margherita Burgers

You can change the given quantities of pretty much any of the ingredients to suit your tastes.


2 lbs lean ground beef

1 egg

1/3 cup plain bread crumbs

1/4 to 1/3 cup of sun dried tomatoes, in oil, chopped finely

2 tbsp of the oil the tomatoes are packed in

1 small red onion, finely diced

1/2 cup of chopped fresh basil

Salt and pepper to taste


Hamburger buns

Slices of fresh tomatoes, mozzarella and fresh basil leaves, for garnish


In a large bowl, mix the ground beef, egg, bread crumbs, sun dried tomatoes, oil, onion, chopped fresh basil and salt and pepper. Mix well and form 8 patties. You can cook the burgers on the BBQ, in a pan or, as I like to cook them in my panini press, it takes half the time as they cook on both sides at the same time! Just cook them from 8 to 10 minutes per side or until the internal temperature of each patty is 160F. Let the burgers rest a few minutes before serving them.

Heat or toast the hamburger buns, place a patty on each bun, then top with mozzarella, tomato slices and fresh basil leaves. Then enjoy what's left of Summer!
Pin It!

Friday, May 7, 2010

Last Minute Inspiration

Sometimes, I get really wrapped up in what I'm doing like, say, laundry or cleaning or, I don't know, reading a blog maybe... And then I look at the time and I realize, it's time to start supper, like now! And most days, I menu plan, but what if I just don't feel like eating what I have on the menu for that day? That always happens on the days I'm right at the last minute to make supper. So I look in the freezer and the pantry, and the refrigerator and then back to the pantry and then, time flies you know, I have to find something to make, and then, I have a flash.

Shrimp Pizza

Let's say I take those thin burger buns and split them in half, that could make a great mini-pizza... And those shrimp in the freezer, I could thaw them out in some chicken broth and sauté them in a little butter, garlic, pepper flakes and that would make a great topping... A creamy bechamel for the sauce, grated mozz on top, a brief trip in the oven, garnish with green onions and, bingo! A quick and easy supper. It's on days like those that I realize the importance of a well stocked kitchen. I love last minute inspiration.

Shrimp Pizza, Top

Mini Shrimp Pizzas

The amount of ingredients you need to make the pizzas will depend on how many people you want to serve.


shrimp, thawed if frozen

1 or 2 cloves of garlic, minced

red pepper flakes, to taste

olive oil


Bechamel sauce:

2 tbsp butter

2 tbsp flour

1 cup of milk

salt and pepper, to taste


thin burger buns ( like these)

grated mozzarella cheese
green onions, chopped for garnish


First, make the bechamel sauce. Melt the butter in a small saucepan. Add the flour and cook, stirring constantly, for 1 minute. Add the milk and whisk until it boils. Let simmer for about 5 minutes or until the sauce has thickened. Salt and pepper to taste and set aside.


In a skillet, heat some olive oil and add the garlic. Sprinkle in some red pepper flakes, to taste, and cook for about 1 minute. Add the shrimp and cook until they are pink and beautiful. Set aside.


If you have a pizza stone, now is the time to put it in your oven and preheat it to about 500F. If you don't have a pizza stone, preheat your oven to 450F and line a baking sheet with parchment paper.


Split the hamburger buns and spread some of the bechamel on the inside of the buns. Place some shrimp on top of that, and sprinkle with the mozzarella. Place the pizzas on the pizza stone (or the baking sheet) and bake until the cheese is bubbly and golden. Garnish with green onions and serve with a salad (I'm in love with arugula these days).
Pin It!

Monday, April 26, 2010

When in Doubt, use Maple Syrup (Maple Sesame Salmon Fillets)

I spend so much time trying to create meals that the whole family will enjoy together, I sometimes get a bit discouraged. But then I'll find something the kids will ask seconds of, and at that moment, I know it's all worth it.

To me, the key to a "happy meal" (ha!) is using a main ingredient I know we all like (in this case salmon fillets) and pairing it with flavors that are kid friendly. Maple syrup is always a winner at our house as are Asian flavors. So I mixed and matched and ended up with a recipe I'll be making over and over again.

Maple Sesame Salmon Fillets


Salmon or trout fillets (enough for 4 to 6 people)

3 cloves of garlic, finely chopped

1/3 cup maple syrup

1/4 cup soy sauce (I use reduced sodium)

2 tsp rice vinegar

1 tsp sesame oil

1/2 tsp Sriracha sauce (or hot sauce of your choice)


Toasted sesame seeds, for garnish


Mix all the ingredients except the salmon and the sesame seeds. You can either use a bowl or a ziptop bag. Place the salmon in the marinade and let rest, in the refrigerator for at least 15 minutes.


Since the marinade is sweet, I usually line a baking sheet with aluminum paper, it makes clean up much easier. Preheat your broiler and place the oven rack in the middle of the oven. Place the salmon fillets on the baking sheet and broil for about 10 minutes. If you like, you can baste the fish with the marinade once or twice during cooking. To see if the salmon is ready, use a fork to flake the fillets and check if they are cooked through. You'll know that the fish is cooked when its flesh turns opaque. You might need to cook the salmon a little longer, depending on the size of your fillets.


Garnish with sesame seeds and serve with a side of rice and veggies of your choice.
Pin It!