Showing posts with label fish. Show all posts

Monday, June 21, 2010

Summer's Here (Broiled Salmon with Fresh Tomato Salsa)

As I sit here with this cool breeze coming through my kitchen window, I can't believe it's really Summer, which means almost half the year is gone already and I feel like I haven't seen it go by. Always hurrying to do one thing or another, and of course, not being able to do everything I want to do. Is it just me?


If you do have time to sit down and enjoy a meal, as we did this past Sunday, on Father's Day, this would be the dish to prepare. So easy and adaptable, you might just be able to squeeze in a walk to your favorite park, all in the same day!


Broiled Salmon with Fresh Tomato Salsa

This is a great recipe if you're like me and you just can't follow a recipe! Adapt the quantities and spices and herbs as you wish and make this perfect for you.

Salmon fillets, bones removed
Olive oil
Lime juice
Garlic cloves, minced
Coriander powder
Salt and pepper

Tomatoes
Red onions, chopped
Olive oil
Lime juice
Parsley, chopped

Preheat your broiler and line a baking sheet with parchment paper. Place your salmon fillets, skin side down on the prepared sheet. Drizzle with olive oil and lime juice, then sprinkle with the chopped garlic. Add as much coriander powder, salt and pepper as you like. Broil the fillets for about 10 minutes, until the salmon is opaque and flakes easily with a fork.

While the salmon is broiling, prepare your salsa. Chop up a large tomato, or a few smaller ones, removing some of the seeds so it's not too watery. Add some chopped red onions, a drizzle of olive oil and lime juice and some parsley. When the salmon is cooked, remove it from the oven, scatter the salsa on top of the fillets and put it back under the broiler for a few minutes, just to warm the salsa. Serve with some rice and a crunchy green salad on the side.


Pin It!

Monday, April 26, 2010

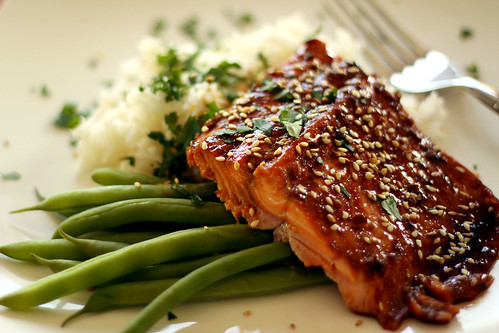
When in Doubt, use Maple Syrup (Maple Sesame Salmon Fillets)

I spend so much time trying to create meals that the whole family will enjoy together, I sometimes get a bit discouraged. But then I'll find something the kids will ask seconds of, and at that moment, I know it's all worth it.

To me, the key to a "happy meal" (ha!) is using a main ingredient I know we all like (in this case salmon fillets) and pairing it with flavors that are kid friendly. Maple syrup is always a winner at our house as are Asian flavors. So I mixed and matched and ended up with a recipe I'll be making over and over again.

Maple Sesame Salmon Fillets


Salmon or trout fillets (enough for 4 to 6 people)

3 cloves of garlic, finely chopped

1/3 cup maple syrup

1/4 cup soy sauce (I use reduced sodium)

2 tsp rice vinegar

1 tsp sesame oil

1/2 tsp Sriracha sauce (or hot sauce of your choice)


Toasted sesame seeds, for garnish


Mix all the ingredients except the salmon and the sesame seeds. You can either use a bowl or a ziptop bag. Place the salmon in the marinade and let rest, in the refrigerator for at least 15 minutes.


Since the marinade is sweet, I usually line a baking sheet with aluminum paper, it makes clean up much easier. Preheat your broiler and place the oven rack in the middle of the oven. Place the salmon fillets on the baking sheet and broil for about 10 minutes. If you like, you can baste the fish with the marinade once or twice during cooking. To see if the salmon is ready, use a fork to flake the fillets and check if they are cooked through. You'll know that the fish is cooked when its flesh turns opaque. You might need to cook the salmon a little longer, depending on the size of your fillets.


Garnish with sesame seeds and serve with a side of rice and veggies of your choice.
Pin It!

Friday, April 24, 2009

California Rolls or Beginner Sushi

One very good thing about having friends who love to bake/cook/eat as much as I do is that sometimes they make me discover something that I might not have tried out for myself. Take sushi, for example. Martin loves sushi, but when he had it for the first time, at a party at work, I was pregnant and raw fish just wasn't something that was very appetizing, at the time.

Fast forward almost 2 years and a friend invites the kids and I for dinner as both our guys would be working late and wouldn't that be a good excuse to get together, have a glass of wine and just talk each others' ears off. She had recently tried making sushi and she was so excited to make some for us and show me how easy it was. I was very intrigued and let me tell you, it is easy and really, really delicious! She made a few variations of California rolls, no raw fish, and I was hooked! I didn't think you could make so many different kinds of rolls; there was imitation crab, spicy shrimp, smoked salmon and vegetarian. Needless to say, I couldn't wait to try making some myself so, the next weekend, I got everything I needed and set up shop!

These days you don't really need to go to a specialty store to get ingredients for your sushi. Most supermarkets even have little sushi shops where you can buy the rolls already made or ask the sushi chef for tips and tricks. I've found that they're always happy to help, even if they do seem to find it a little odd that you'd want to make sushi yourself when you can buy it right then and there. Imagine if I had tried to bring my camera and take pictures in the supermarket, that would have gotten me a few weird looks!

Please remember that I am by no means an expert, and there are a lot of more experienced sushi makers out there with how-to posts you can check out too. But I had fun making these and I'll try to show you how I made my sushi and maybe you'll be intrigued and try to make some too. If I could do it, anyone can!

What you'll need for each roll:
1 sheet of nori
1 cup of cooked sushi rice*
Black sesame seeds, or regular sesame seeds, roasted
Grated carrots
Cucumber, sliced lengthwise into thin strips
Avocado, sliced thinly
Your choice of smoked salmon, shrimp or imitation crab
Cream cheese, if you're using smoked salmon
Fried egg roll wrappers, crushed (adds a little crunch)

You can make things easier on yourself by having all of your ingredients ready and close-by, because once you start you don't want to have to run around looking for this and that. Also, a good trick is to wrap your bamboo rolling mat with plastic wrap before you start, it'll make it a lot easier to clean. Oh, and have a bowl of water near by so you can wet your hands from time to time, otherwise you'll end up with sticky rice everywhere.

Place a sheet of nori on your bamboo mat (shiny side down) and spread 1 cup of rice on top of it, leaving a 1 inch space at the end. Sprinkle some black sesame seeds onto the rice. Arrange your choice of ingredients into a strip and start rolling at the edge closest to you. Use the bamboo mat to roll the sushi firmly. You can use a few drops of water at the seem to help the seaweed to stick at the end of the roll.

Use a sharp knife to cut the roll into about 8 pieces. It's easier if you cut the roll in half and then cut the ends into equal pieces. Serve the sushi with soy sauce, wasabi and pickled ginger.

The variations for the rolls are endless. You can make a shrimp salad using a little bit of hot sauce and mayonnaise and adding it to chopped shrimp. You can spread a little cream cheese onto the rice before adding the smoked salmon. You can do all veggies and use red bell pepper for even more color and crunch. Use your imagination and have fun!


* For the sushi rice:

You absolutely have to use short grained rice. Use specialty sushi (or Japanese) rice. It's a lot like Arborio rice, the kind used for risotto. In a saucepan, add 1 1/4 cup of water and 1 cup of sushi rice. Bring to a boil, reduce heat to low and cook for 15 minutes, without stirring, until rice is tender and still shiny. Now here's where it gets interesting. To the cooked rice you can add 3 tablespoons of rice vinegar and 1 teaspoon of sifted confectioner's sugar. I didn't add the vinegar or the sugar as I wasn't sure I would like it but I might try it next time. You can then place the rice in a bowl or spread it on a baking sheet and let it cool to room temperature.

Pin It!

Friday, March 14, 2008

Enjoying Dinner

Enjoying dinner with kids all depends on how they decide to react to what you put in their plate. One day they’ll eat whatever you put in front of them, without saying a word. The next they’ll be outraged because, horror, you put onions in your pasta sauce! Or “Mom! You put pepper in here, I can SEE the black flecks!”, and so on.

When I decided the other day, inspired by Ricardo yet again, to make a fish lasagna, I wasn’t sure how they’d react. I made it anyway, because, hey, I’m the Mom and I decide what’s for dinner, most the time anyway. I served it to my toughest critics and you know what? They ate it, without a word, they even liked it! So dinner was enjoyed by all and I have to say this lasagna was a welcome change from the usual pasta dish. Cooking the fish inside the pasta is a wonderful idea as it stays moist and tender. And the tomato and cheese sauces didn’t overpower the fish as I had thought it might.

All in all, this was a great dish and I’ll surely make it again. How will the critics react next time? You never know!

Pangasius Lasagna

I used Pangasius for this dish but you could use Tilapia or any other white fish for that matter. Also, I made a cheesy béchamel sauce but you could use cottage cheese or ricotta or even crème fraîche, just as long as you have something creamy in between layers of pasta. If you want to make this even quicker, you can use store bought tomato sauce instead of making your own.

Ingredients
For the tomato sauce:
2-3 tbsp olive oil
1 onion, chopped
4 garlic cloves, finely chopped
3 ribs of celery chopped
1-28 oz can of crushed Roma tomatoes
1/2 tsp dried oregano
1/2 tsp dried basil
1/2 tsp dried thyme
Salt and pepper to taste

For the cheese sauce:
3 tbsp butter
3 tbsp flour
2 cups milk
2 cups grated cheese (I used a mix of cheddar and Gruyère, but anything would do)
Salt and pepper to taste

For the Lasagna:
12 lasagna noodles, cooked and drained
4 Pangasius filets, about 1 ½ pounds
Tomato sauce
Cheese sauce
2 cups shredded mozzarella cheese
salt and pepper to taste

Directions
For the tomato sauce:
In a large saucepan, heat olive oil. Sauté onions, garlic and celery until onions are translucent. Add tomatoes, herbs, salt and pepper, and simmer over low heat for ½ hour to 1 hour. Set aside.

For the cheese sauce:
In a large saucepan melt butter over medium heat. Add flour, stir with a whisk and cook for about 1 minute. Add milk and stir constantly until sauce thickens. Remove from heat, add cheese, salt and pepper, and stir until melted. Set aside.

For the lasagna:
Preheat oven to 350F.
Take out a 9 x 13 inch baking dish. Spread a thin layer of tomato sauce on the bottom of the dish. Lay 4 lasagna noodles on top of the sauce, then add more tomato sauce, a layer of cheese sauce and a little mozzarella. Lay 4 more noodles, tomato sauce, the fish filets, a little more tomato sauce, cheese sauce and mozzarella. Lay the last 4 noodles on top of that, the rest of the tomato sauce, the rest of the cheese sauce and cover with mozzarella. Cover the dish with aluminum foil and bake for 1 hour. Remove the foil and bake for another 15 minutes, or until the top of the lasagna is golden brown. If it doesn’t get brown enough put it under the broiler for a few minutes, that should do the trick. Make sure to let the lasagna rest for at least 15 minutes before serving as it will be very hard to cut into squares strait out of the oven. Serve with a nice green salad.

Pin It!

Wednesday, January 16, 2008

Fish Tales

I have never been fishing. Like most people, I rely on my supermarket to provide the freshest fish available. But that has not always been the case. My Dad doesn’t go fishing anymore, but as a child I remember him coming home from his fishing trips with baskets full of rainbow trout. He would clean and prepare the fish, then coat them lightly with flour, salt and pepper. Into the frying pan they would go until their skin got golden and crispy and delicious. Simple is best.


The closest thing to the taste of trout is salmon. I always keep salmon fillets in the freezer to use for all sorts of recipes. Once thawed I poach the salmon in simmering water, flake with a fork and refrigerate until I’m ready to use it. Last night I made a salmon burger recipe I found on Isa’s site. Her blog is in French and totally worth the visit. The burgers were a hit, though closer to a fish cake than a burger so they sort of fell apart as we ate! The next time I make these I’ll most likely serve them with a salad and bread on the side.


Today I mixed the rest of the poached salmon with leftover tartar sauce, spread the mix on a toasted bagel with lettuce, served baby carrots on the side, and that was lunch. Simple, easy and good for you. What could be better?


"Fish" by Thomas

Salmon Burgers (or Fish Cakes)
Adapted from Les Gourmandises d’Isa

1 lb salmon fillets, cooked and flaked with a fork
2 tbsp fresh parsley, finely chopped
2 tbsp dill, finely chopped (I omitted this)
2 tbsp lemon juice
1 tbsp capers, finely chopped
2 pickles, finely chopped
1 cup ( environ 350 g ) cooked and mashed potatoes
Salt and Pepper, to taste
1 egg (I added this to help them hold their shape)
Flour

In a large bowl, mix all of the ingredients together (except flour). Make 4 patties, lightly flour them and refrigerate for at least 1 hour.

Heat a few tbsp oil in a non-stick skillet and cook patties for 5 to 6 minutes on each side, or until nicely golden. Serve as hamburgers with lettuce, tomatoes, onion slices and tartar sauce or as fish cakes with a salad and bread on the side.

Tartar Sauce
From Ricardo and Friends

1/2 cup (125) mayonnaise
1 tbsp (15 ml) sweet pickles, chopped
1 tsp (5 ml) capers, chopped
1 tbsp (15 ml) lime juice
1 tsp (5 ml) fresh chives, finely chopped

In a bowl, mix the ingredients. Sprinkle with salt and pepper.


Pin It!