Showing posts with label blogging events. Show all posts

Sunday, December 20, 2009

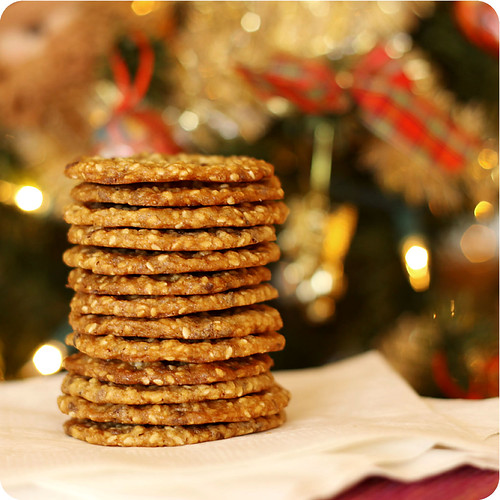
Eat Christmas Cookies - Sesame Snap Wafers

So, Christmas is in a few days, 2009 is almost over and frankly, I have a hard time believing it. I mean, where did this year go? There were so many things I wanted to do that will just have to wait for next year, and a few will probably have to wait even longer. Maybe it's just the Holiday Season, which always makes me a little weepy, well, OK, weepier than usual, but I just seem to notice that everything is changing around me at the speed of light. The kids are growing up way too fast, and I mean WAY too fast. One minute it was Fall and the next minute there was like 2 feet of snow on the ground. on November 17th, I was stoked when Susan of Food Blogga announced the 3rd season of her Eat Christmas Cookies event and I had a whole month to choose which cookie recipe I could send in. And now, it's December 20th (What?!) and I'm once again at the last minute. How did this happen? Your guess is as good as mine.


In any case, I still love baking cookies and I have baked my fair share since the beginning of December, but they were just my "usual" cookies, cookies that can already be found either here or on other great food blogs so I'll spare you the reruns. The recipe I want to share today is one that I've wanted to try for a long time but it just got to the bottom of the list and I forgot about it. This week, I happened to have all the ingredients handy so I went for it! These are so crispy and crunchy and fragrant, they remind me of Lace Cookies but with a nuttier flavor.

Santa, I hope you like sesame seeds!!! :) Please check out the Eat Christmas Cookies round-up page for more great cookie recipes!


Sesame Snap Wafers
adapted from Robin Hood Baking Festival 1999


2/3 cup all purpose flour

1/4 tsp baking powder

1/2 cup butter, softened

1 cup packed brown sugar

1 egg

1 tsp vanilla extract

1 1/4 cup sesame seeds*


Start by toasting your sesame seeds. I like to do this in a dry, nonstick pan, over medium heat. Watch them carefully and move them around often as they could burn easily. Toast the seeds until they're fragrant and golden. Be sure to do this a little in advance, you want them to have time to cool before you make the cookie dough.


When your seeds have cooled to room temperature, preheat your oven to 350F and line a baking sheet with parchment paper.


In a small bowl, combine the flour and baking powder; set aside.


In another bowl, cream the butter with the sugar, egg and vanilla. Add the dry ingredients and the sesame seeds and mix well.


Drop the dough onto the prepared baking sheet, about a teaspoon's worth per cookie, leaving enough space between the cookies as they spread while baking.


Bake the cookies about 6 to 8 minutes, or until golden. You can leave them a little longer if you like them crispier. The cookies will be soft right out of the oven so leave them on the baking sheet a minute or so before you transfer them to a wire rack to cool completely.

* You can use all sesame seeds or a combination of sesame seeds, black sesame seeds and flax seeds. I used 1 cup of sesame seeds and 1/4 cup of flax seeds.

Pin It!

Friday, December 19, 2008

Cookies for Santa

I've been meaning to tell you guys about these cookies for a while now but I've just never gotten around to it. Susan from Food Blogga has given me the perfect excuse with her event, Eat Christmas Cookies, Season 2. I make these cookies every year during the Holidays and a few of them always find their way onto Santa's plate.

The cookies are made up of three flavors of dough, vanilla, cherry and chocolate. They're meant to mirror the traditional look of Neapolitan ice cream. I know that usually, Neapolitan ice cream's pink is strawberry flavored but the candied cherries in this recipe give the cookies such a nice color and they taste good too! The recipe comes from the same Robin Hood booklet in which I found my recipe for Pouding Chômeur. I love that little booklet so much, I might have to "borrow" it next time I see my mom.

Being refrigerator cookies, once the dough is made they fall into the "I'll bake these when I have time" category, which I find really useful during the Holidays. The cookies do call for a little more prep than usual refrigerator cookies but they're so cute and fun, they're worth the extra work.

Part of the round-up for Eat Christmas Cookies is already up over on Food Blogga but you still have a few days to submit an entry. So go on and bake Christmas cookies! Hope you like these, Susan!


Neapolitan Cookies

2 1/4 cups all-purpose flour

1/2 teaspoon baking powder

1/8 teaspoon salt

1 cup butter, softened

3/4 cup granulated sugar

1 egg

1 teaspoon vanilla extract

1/4 cup of candied cherries, finely chopped

5 to 10 drops red food coloring

1 (1 ounce) square unsweetened chocolate, melted

1/4 cup toasted, finely chopped pecans


In a small bowl, mix together flour, baking powder and salt. Set aside.


With your mixer of choice, in a large bowl cream together butter and sugar. Add the egg and the vanilla, beating well. Add the dry ingredients and mix until blended.


Divide the dough into thirds. Keep one part as is. To one part add the candied cherries and the red food coloring. To the third part, add the chocolate and chopped pecans. Wrap each piece with plastic wrap and refrigerate for one hour.


After one hour, shape each piece of dough into a 12" X 2" X 1/2" rectangle. Place each rectangle one on top of the other, keeping the pink one in the middle.* Refrigerate the dough log for at least 4 hours, until firm.


When ready to bake, preheat your oven to 350F and line a baking sheet with parchment paper. Slice the log into 1/8" slices and place them 1/2" apart onto the prepared baking sheet.


Bake the cookies for 10 to 12 minutes. Let them rest for one minute on the cookie sheet before transferring them to racks to cool completely.


* The original recipe stated to keep the pink slice in the middle but after a little research, I think the traditional Neapolitan ice cream had the white part in the middle. Either way, still good! :)


Pin It!

Monday, September 15, 2008

Fashionably Late

Or should that be "Fashionably Last Minute"? In any case, I'm at the last minute, as usual, for a really fun blogging event. Susan from Sticky, Gooey, Creamy, Chewy is celebrating her first year blogiversary with a Blogiversary Bash. And she's inviting the food blogging community to the party! Isn't that sweet?

So, I thought really hard about what I should send to her, wrote down a few ideas and as usual, time flew by and I forgot. So there I was, this morning, reminded of the deadline and looking through my ideas, frantically trying to find something worthy of a party. Then it hit me. Every party needs some sweet bites and I had recently made a batch of that delicious Ground Cherry Compote I told you guys about a while back.

What better way to showcase it than on a thin slice of French bread, toasted lightly and topped with a good Gruyère cheese. The sweet, savory pairing works really well here and makes a nice addition the usual party bites. Plus, they're really easy to make, especially if you're caught at the last minute. So if you're like me, you've got until tonight to send in your party food suggestions to Susan. It's not too late to join the party!


Pin It!

Wednesday, August 6, 2008

No Heat to Beat!

Like the title says, there is no heat to beat. It's been cold and rainy here for the most part of the last 3 weeks. Perfect Fall weather. And I love Fall but not in the Summer!

I'm really not a fan of warm and humid weather, it's just that we'd have at least liked to do some outdoors stuff. Picnics in the park? Too wet. Swimming? Not in this cold weather! Car trips? Well, we've had a few of those, but driving in the rain isn't that fun. At least the lack of warm weather didn't stop me from making refreshing desserts. It's technically still Summer and gosh darn it, I'm making the most of it!

So for Grace's Beat the Heat event I made this Lemon-Lime Frozen Yogurt. To me, nothing says refreshing like lemon or lime and the two together are a perfect match. I found this recipe on Dessert First, via Food Blog Search, and adapted it a little to get what I wanted.

I hope you like lemon-lime Grace! Eating this, it felt a lot more like Summer time, I think I even saw the sun peaking through the clouds for a little while... Just a little while though.


Don't forget to check out the Beat the Heat round-up at A Southern Grace!

Lemon-Lime Frozen Yogurt
Adapted from Dessert First

3 cups plain whole milk yogurt
1 1/2 cups sugar
1/2 cup fresh lemon juice
1/2 cup fresh lime juice
1/2 tbsp lemon zest
1/2 tbsp lime zest

In a large bowl, combine all ingredients together. Chill for at least 2 hours.

Using your ice cream maker of choice, freeze into pure bliss. Enjoy!


Pin It!

Sunday, July 20, 2008

Making Memories with a New Cheesecake

Cheesecake is one of my all time favorite desserts. When we lived in Montreal, my mom would take me and my brother for walks and stop off at this wonderful bakery, of which I don't remember the name, typical. We would share a huge piece of the thickest, creamiest, strawberry cheesecake ever. To this day, I've never been able to find a cheesecake to top that one. Maybe it's the memories attached to the cake that makes it so special, or maybe my tastes have changed since those early days, but one thing's for sure, I still love cheesecake.

A little more than a week ago, I got this undeniable comfort food/dessert craving. This all started when I was looking for recipes to use up some Quark cheese I had in the fridge. Of course, I turned to Food Blog Search and came across this wonderful recipe. I printed it out and started thinking about how I could switch things up a little. I had some raspberries to use up as well and I remembered this post from Elle about raspberry-lime muffins. As soon as I made these muffins using lime zest instead of lemon, I knew why Elle had become obsessed with those flavors! So, raspberry-lime cheesecake it was!

My craving was totally satisfied. This cake is not too moist which makes it perfect with the raspberries bursting in every bite. And the lime pulls it all together, it just makes the flavors pop! I'm sure this would be great with lemon and blueberries, or maybe strawberries and orange. Really there are so many possibilities, I don't know why you guys are still here! Get baking already!

And because I liked this cake so much, I decided to send it to sweet Susan from Food Blogga who is hosting Sugar High Friday #45. The theme is berries, what else! I can't wait for the berry-liscious round-up! SHF is a monthly event created by Jennifer, The Domestic Goddess.

Raspberry-Lime Cheesecake
Adapted from Kedai Hamburg

100g flour
1 tsp baking powder
200g superfine sugar
Zest of 1 lime
200g cream cheese, softened
250g Quark cheese
3 eggs
125g butter, melted
Juice of 1 lime
150g fresh raspberries

Preheat oven to 350F (180C). Line a 26 cm (10 inch) spring form pan with parchment paper. Also grease the pan well.

In a small bowl, mix the flour with the baking powder. In another bowl, mix the sugar with the lime zest, mashing it together with a fork. Set these aside. In a large bowl, with your mixer of choice, combine the cream cheese with the Quark cheese until well blended. Add the eggs, one at a time, mixing well in between each addition. Add the sugar mixture, then the melted butter and the lime juice. Add the dry ingredients and mix well. Pour the batter in the prepared pan and distribute the raspberries evenly throughout the surface of the cake. Bake in the preheated oven for about 45 to 50 minutes, until the edges of the cake are golden brown. Let the cake cool in the pan. Once the cake has cooled, run a knife in between the cake and the pan before unmolding.

PS: I apologize to those of you who don’t have a kitchen scale, I was too lazy to convert to imperial units. That being said, I highly recommend purchasing a kitchen scale. I just got one recently and I love it!

Pin It!

Thursday, June 5, 2008

The Blogging Community, at its Best

Although I haven’t been blogging for a very long time, I would have had to be blind not to notice the overwhelming amount of love and support throughout the blogging community. From blogging awards to birthday wishes and sincere get well soon comments, I have felt the love myself and now it’s time to give some back.

Everyday as I click on a recipe or a blog link, I keep discovering talented people and wonderful blogs. I have only recently discovered Briana Brownlow’s blog, Figs with Bri, and I really wish I had found it under different circumstances. Bri is fighting cancer and some wonderful people have decided to support her and help her fight. If you would like to help Bri, go to the end of this post and you will find all the information you need about the event that Bee and Jai of jugalbandi have organized.

I decided to share this recipe for Rhubarb Raspberry Galette with you today because it feels to me like a comforting dessert. Something you would bring to a friend’s house when they’re feeling down or just to say: “Hey, let’s have a cup of coffee and talk”.

Although rhubarb is classically paired with strawberries, the raspberries are wonderful in this. The raspberries I used were a bit tart so the galette didn’t turn out overly sweet and you could still taste the tartness of the rhubarb as well. I'm telling you, these are the perfect excuse to forget about housework, visit a friend and have a nice chat.

Rhubarb Black Raspberry Galettes
Canadian Living Magazine June 2008

2 cups all purpose flour
1/2 cup cornmeal
1 tbsp. granulated sugar
1/2 tsp. salt
1 cup cold unsalted butter, cubed
3 tbsp. sour cream
1/2 cup ice water (approx.)

Filling:
1 cup granulated sugar
3 tbsp. cornstarch
5 cups sliced fresh rhubarb
1 1/2 cups black or red raspberries
1 tbsp. lemon juice
1/2 cup dry bread crumbs
2 tbsp. butter, softened (I forgot this, oops…)

Glaze:

1 egg yolk

In bowl, mix together flour, cornmeal, sugar and salt; using pastry blender or 2 knives, cut in butter until in large crumbs. In glass measure, whisk sour cream with water; drizzle over flour mixture, tossing with fork until dough comes together and adding up to 1 tbsp more water if necessary. Divide into 6 pieces. Shape each into disc. Wrap each in plastic wrap; refrigerate for 30 minutes or until chilled. (Make-ahead: Refrigerate for up to 24 hours.)

Filling: Remove 2 tbsp of the sugar and set aside for sprinkling over galettes. Whisk remaining sugar with cornstarch; set aside.

In large bowl, toss together sliced rhubarb, berries, lemon juice and cornstarch mixture.

On lightly floured surface, roll out each disc of pastry to 8-1/2 inch circle, leaving edge ragged. Arrange 3 of each on 2 large parchment paper-lined baking sheets.

Sprinkle center of each with bread crumbs. Spoon 1 cup rhubarb mixture over top; dot with 1 tsp butter. Lift pastry up over filling to form about 5-inch circle, letting pastry fall naturally into folds around edge and leaving center uncovered. (Make ahead: Cover and refrigerate for up to 24 hours.)

Glaze: Beat egg yolk with 1 tbsp water; brush over pastry. Sprinkle with reserved sugar.

Bake in top and bottom thirds of 425F oven for 10 minutes. Reduce heat to 350F; bake for 10 minutes. Switch and rotate pans. Bake for about 15 minutes or until filling is bubbly and crust in golden. Let cool on rack for 15 minutes.


This is an appeal on behalf of a group of food bloggers who are friends of Briana Brownlow @ Figs With Bri.

Bri was diagnosed with breast cancer two and half years ago. A mastectomy, chemotherapy and two years of relatively good health later, the cancer is back. It has metastasized to other parts of her body. At the age of 15, Bri lost her 41-year old mother to the disease. Now, she’s waging her own war against breast cancer. More about it here.


She is going through intensive chemo and other treatments and needs to focus single-mindedly on healing and finding what treatment works best for her. Her health insurance, unfortunately, does not cover holistic alternatives which she would like to try. Bri and her husband Marc have enough on their plates right now in addition to worrying about her medical bills.


The team organising the JUNE edition of CLICK at Jugalbandi has organised a fundraiser to help Bri and her family meet her out-of-pocket medical costs for ONE YEAR.


CLICK is a monthly theme-based photography contest hosted by Jugalbandi. This month’s theme is: YELLOW for Bri
Yellow is the colour of hope. Through the work of the LiveStrong Foundation, it has also come to signify the fight against cancer.

The entries can be viewed HERE. The deadline for entries is June 30, 2008. The fundraiser will extend until July 15, 2008.


The target amount is 12,000 U.S. dollars. We appeal to our fellow bloggers and readers to help us achieve this. Bri deserves a chance to explore all options, even if her insurance company thinks otherwise.


There’s a raffle with exciting prizes on offer. After viewing the list, you may make your donation HERE or at the Chip-In button on any participating site.
Your donation can be made securely through credit card or Pay Pal and goes directly to Bri’s account.

This month’s photo contest also has some prizes. Details HERE.

You can support this campaign by donating to the fundraiser, by participating in CLICK: the photo event, and by publicising
this campaign.

Pin It!

Thursday, May 29, 2008

Them Bones, Them Beautiful Bones

Ever since I read about the Beautiful Bones event, I knew I would participate. I even knew right away what dish I would be making. Why in the world then am I waiting until 2 days before the deadline to post my recipe?

I’ve been thinking about the way I would approach this post for almost a month. You see, my father suffers from osteoporosis and recently broke his hip. He’s been in the hospital for over a month now as he’s also been diagnosed with Parkinson’s disease. His quality of life has greatly diminished over the last few years, but he tries very hard to stay strong. I think it’s wonderful that bloggers like Susan, of Food Blogga, put together events such as this one, to raise people’s awareness of diseases like osteoporosis. Without becoming an alarmist, I think we (myself included) should all realize that what, and how we eat greatly impacts what we become later in life.

This salmon loaf is a wonderfully easy recipe. Just mix all the ingredients together, bake for a little while and you get a calcium rich dish that’s also very delicious! I promise, even my kids love it!


Salmon Loaf
From “Qu’est-ce qu’on mange?

2 eggs
2 – 7 oz cans salmon, drained, bones and skin removed
1 cup quick cooking oats
1 cup mozzarella cheese, grated
1 carrot, grated
1 celery stalk, chopped finely
1 small onion, chopped finely
2 tbsp lemon juice
Salt and pepper to taste

Preheat oven to 350F and grease a 9 x 5 inch loaf pan.

Put all ingredients in a large bowl and mix until well combined.

Place mixture into the prepared pan and pat it down lightly.

Bake in preheated oven for about 35 minutes.

Let the loaf rest 5 minutes before slicing.

Serve as is or with a béchamel sauce.

Béchamel Sauce
3 tbsp butter
3 tbsp flour
2 cups milk
Salt and pepper to taste
Pinch of nutmeg (optional)

In a saucepan, melt butter over medium heat. Add flour, mix well with a whisk, and let it cook for about 2 minutes. While whisking, add the milk. Keep whisking until the sauce thickens. Remove from heat and season to taste.

Pin It!

Wednesday, May 21, 2008

Happy, Happy Birthday Baby!

Today is Olivia's Birthday, she's one year old, imagine that! It seems only yesterday I was holding the tiniest little girl in my arms and now, she's just about to start walking around! All you mothers out there will know what I mean when I say that they really do grow up too fast!

Since Olivia and I share the same birthday, I also get to be a year older today, 35 years old to be exact. It feels weird saying that, I don't feel 35, but then again, what should 35 feel like? I guess it's different for everyone. Since I don't want to dwell on the fact that I'm getting older, ahem, today is going to be all about Olivia!
I'll be posting our birthday desserts a little later this week, I can't tell you everything today, where would be the fun in that! So I leave you with our birthday breakfast, a sweet treat in the form of Cranberry Orange Scones with an Orange Glaze. I'm sending this over to Helen, otherwise known as the lovely Tartelette, for Sugar High Friday #43-Citrus. Hope you all have a wonderful day!


Cranberry Orange Scones
2 cups flour
1/4 cup sugar
3 tsp baking powder
1 tsp salt
1/3 cup butter
1/4 cup dried cranberries, chopped
finely grated zest of one orange
1/2 cup milk
2 eggs

In a large bowl mix flour, sugar, baking powder and salt. Cut in butter until mixture resembles coarse crumbs. Add cranberries and orange zest. Add milk, one egg and one egg yolk (reserve the white). Mix until blended. Drop dough onto a lightly floured surface and knead delicately about 20 times. With floured hands pat dough into a 1/2 inch thick circle. Transfer to a parchment paper lined baking sheet and with a sharp knife, score dough into 12 slices (as with a pie). Brush top with reserved egg white and sprinkle with additional sugar. Bake in preheated 425°F oven for about 20 minutes. Serve warm, topped with glaze.

Orange Glaze
1/2 cup confectioner's sugar
2 to 3 tsp orange juice

Sift confectioner's sugar into a bowl. Add orange juice and mix until thoroughly blended. Add more orange juice to adjust the consistency. Spread onto scones.


Pin It!

Thursday, May 8, 2008

Macarons Obsessed

Why is it that I am obsessed with macarons? They seem to be everywhere I turn, in my virtual blogworld, and they are so darn cute! Months ago I decided I would try my hand at making macarons. So I researched, and read, and studied, and compared recipes.

All the while getting more and more stressed out about it. Would they turn out? Would they have those little feet that make them so cute? Would they be good? What do they even taste like? I bought a kitchen scale for the sole purpose of making my first macarons. Well, okay, I must admit, it was the perfect excuse to get one and I love it to bits! A few days ago I decided I had researched enough and got to work.

It helped that I had found Helen’s tutorial in Desserts Magazine, Issue #2. Our lovely Tartelette has given us all of the tricks she uses to come up with those wonderful little confections and I felt a bit like she was with me in the kitchen as I looked through her article. I whipped my egg whites, folded in the almonds, placed my pastry bag in a tall glass to fill it (one of Helen’s tricks), and then I noticed a lot of the batter was staying at the bottom of the glass. That’s when I knew I had given the batter a few strokes too many, it was too thin. Oh, well. I piped the little guys out anyway and threw them in the oven. There. I was sure they would lay flat on the baking sheet and turn out into thin little meringue cookies.

Imagine my surprise when they started growing little feet right before my very eyes. So the second baking sheet went in the oven and when all the macarons had cooled enough I noticed that the ones from the second batch were a little less fragile. Perhaps there’s a reason for the rest period after all!

My little macarons friends are certainly not perfect and I’m sure their fragility is also due to the fact that my batter was too thin, but I’m extremely proud of them all the same! That is why I am sending these to Minko over at Couture Cupcakes for her event Mad for Macarons in May. And now, I think I know why I’ve been macarons obsessed lately. It’s the process that intrigued me. All those questions I had to ask myself, all that research I did, that’s what I loved about these. I can’t wait to make my next batch! I might go easy on the caramel next time…

Macarons with Fleur de Sel Caramel Filling

For the macarons recipe, I’m sending you to Helen’s turorial in Desserts Magazine, it’s so well written and extremely helpful! For the caramel sauce, I used my usual one but added a 1/2 tsp of fleur de sel at the same time as the butter for a fleur de sel caramel.


Pin It!

Saturday, May 3, 2008

Dueling Dishes

Lists are my thing, I love them. I usually make a list of the week’s dinners the weekend before. But I never make a list for lunches, I should, but it never works out. So I’m always wondering what to have for lunch. That’s when I start flipping through magazines, cookbooks, printouts that are lying around pretty much everywhere in the kitchen.

Last week I was browsing through my copy of the Fine Cooking Annual and I got inspired. This book is full of tempting recipes and fun to know techniques. And the photography is gorgeous. Which is good, because that’s what inspires me. I saw a photo of a zucchini side dish and I got to thinking this would be perfect over pasta. With a few adjustments of my own, of course! As I was chopping and dicing, I realized this would be the perfect dish to enter in Ginny’s Dollar Dish Duel. Yes, our Ginny of Just Get Floury is hosting her first blogging event and I absolutely wanted to participate. The dish should not cost more than 5$ so I started mentally adding what I was using, approximating most of the prices though as I had everything in the fridge and pantry already, and I got my dueling dish! Yes! It did feed 2 people, as in me, again, on the next day! And it was delicious!

So here are my ingredients and prices:
2 zucchinis: 1.50
Rotini pasta, half of a 375g box: .50 (the whole box was 99 cents on sale)
4 oil-packed sun dried tomatoes: .50
1 red onion: .50
2 cloves garlic: .50
freshly grated parmesan cheese: .50
Salt, pepper and olive oil from the pantry

Again, I approximated the prices so a few of the ingredients could be more or less than 50 cents but not a lot and it was easier to add up this way. I wanted to use pine nuts and I totally forgot but they would have been soooo good with this. Also, if you want to go over 5$ a bit, you could toss in some leftover cooked chicken and it would be delicious. There you go Ginny, I can’t wait to see the round-up!

Zucchini and Sun-Dried Tomato Pasta
About 190 grams rotini pasta
Olive oil
2 zucchini squashes, quartered lengthwise, seeds removed and sliced on an angle
4 oil-packed sun dried tomatoes, chopped
1 red onion, diced
2 cloves garlic, minced
Salt and pepper to taste
Parmesan cheese for serving
Toasted pine nuts and cooked chicken, optional

Cook and drain the rotini pasta and set aside.

In a large sauté pan heat about a tbsp of olive oil, over medium-high heat. Add the zucchini, sun dried tomatoes and the onion. Sauté until the zucchini is golden and the onion is translucent. Add the garlic. At this point you can also add the chicken, if you wish. Toss together with the pasta, adding a little olive oil, salt and pepper to taste. Serve with toasted pine nuts, if desired and some grated parmesan cheese.

Pin It!

Friday, April 18, 2008

Ployes for A Taste of Yellow

It is, obviously, my first time participating in A Taste of Yellow, an event to Support LiveSTRONG Day, hosted and created by Barbara of Winos And Foodies. I thought long and hard about the recipe I would be making for the event. I wanted to make a dish that meant something to me, something traditional. And then it hit me: ployes. These griddle cakes are just the right color and I’ve been eating them for as long as I can remember.

Just for the fun of it, I googled ployes to see if I could find anything about them on the net. I was stunned to find recipes for ployes on Food Network Canada, RecipeZaar and various other recipe sites! No two recipes are exactly the same and that’s the way it has always been. There might be as many ways to make ployes as there are people who make them! They can go from thick and crumpet-like to thin as a crêpe, it all depends on who’s at the stove! The shade of yellow the ployes will be depends on the brand of flour and baking powder used to make them. Once, my dad couldn't find his usual brand of baking powder and ended up with bright orange ployes!

My paternal grandmother was a cook in a logging camp when my dad was a small boy and she would make these buckwheat pancakes everyday for the loggers. They’re a tradition in Edmundston New Brunswick, and often served with baked beans, cretons (which is a meat spread), molasses or brown sugar. You can also have a taste at La Foire Brayonne, a yearly fair featuring music, arts and crafts, food, and all sorts of activities. My son and daughter love ployes (the wee one hasn’t tasted them yet!), they even eat them for breakfast with Nutella, but that’s not traditional at all!

So there you have it folks, ployes for A Taste of Yellow. A traditional, comforting family favorite for all our loved ones out there who fight cancer every day.

Ployes (Buckwheat Pancakes)

These are traditionally cooked on a cast iron skillet but an ordinary skillet would do as well. Just make sure not to turn them over when cooking. You’ll know they’re cooked when the surface is dotted with bubbles and dry to the touch. If you find the batter is too thick, just add water until the batter is to your liking.

1 ½ cups of buckwheat flour
1 ½ cups all purpose flour
1 tsp salt
2 tsp baking powder
3 cups of warm water


Mix together dry ingredients. Add water and mix well, incorporating as much air as possible (that will help with the bubbles!). The consistency of the batter should not be too thick so add water if necessary. Spoon batter onto a hot skillet. Cook until the bottom is a little crispy and the top is dotted with bubbles and dry to the touch, you shouldn’t need to turn the ployes. Serve warm with butter or anything else you’d like to try them with!

EDIT: It's been brought to my attention that the brand of baking powder used might affect the color of your Ployes. I've always used Magic brand baking powder. Hope this helps!

Pin It!

Tuesday, April 8, 2008

Tuesdays With Dorie - The Most Extraordinary French Lemon Cream Tart

The Most Extraordinary French Lemon Cream Tart. That is the kind of recipe you gawk at while going through your brand new cookbook and think to yourself: “Wow, that would be so good. Naw, I couldn’t, that’s just too much butter…” .

And then you join a baking club and someone, in this case Mary of Starting From Scratch, chooses that recipe and you’re all like: “Yes! Finally, I have an excuse to make it!”. This week we had the option of making The Most Extraordinary French Lemon Cream Tart or the Fresh Orange Cream Tart. Since I’m really bad at taking decisions, I didn’t. I made both of them. On the same day. Yes, I know, sooooo much butter! And citrus too, let’s not forget about the citrus fruit in these recipes.

We found blood oranges at the grocery store this week, it was fate I tell you! And the most gorgeous, fattest, yellowest lemons I’d seen in a while. I loved making the lemon and orange creams, the smell of the zest was all over the place, and the colors, incredible. I don’t know how I could have made these without a blender though, beating the butter into the zest, juice and egg mixture was extremely easy with it. This is one of the few times since I got my blender, ages ago, that I was actually happy I had it! Of course, since I made both recipes, I took a little liberty with one of them. I couldn’t help pairing the orange cream with a bit of chocolate. A thin layer of ganache poured onto the cooled crust before the cream, and I skipped the glaze entirely. Wow. The sweet bitterness of the chocolate paired really well with the tart sweetness of the orange and the texture of the ganache was very nice against the creaminess of the filling.

The lemon cream, I left as is, aside from a little drizzle of strawberry coulis to make the colors pop. The lemony filling was just tart enough, not overly sweet, just perfect. And then there was the crust. I’m so bad with pie doughs, tart doughs, pâtes sucrées, sablées, call them what you will, they don’t like me. I don’t have a food processor, so I made the dough by hand but I knew, after reading the recipe the first time, that I would have trouble with it. Not enough wet ingredients, I knew I couldn’t make the dough hold together. So I had a bowl of ice cold water at hand just in case, and I added at least 3 tablespoons of water before the dough came together. I don’t know if it’s me or the fact that it’s very dry in my apartment but in any case, I don’t think the texture of the dough was affected. I rolled it out to make the full sized orange cream and pressed it into my mini tart pans to make the lemon creams. Pressing it seemed to prevent shrinkage, I don’t know why exactly, but rolling it gave me a more even thickness. Either way, it made for an incredibly tasty, flaky, buttery crust. Both these recipes are very impressive and, if you can decide which one to make, they’re pretty easy to execute. I just hope you’re all more decisive than I am because I can’t even tell you which one was my favorite, I loved them both! So go see if the other members of Tuesdays with Dorie are better at taking decisions than I am!


The Most Extraordinary French Lemon Cream Tart

Baking From My Home to Yours by Dorie Greenspan

1 cup sugar
Grated zest of 3 lemons
4 large eggs
3/4 cup fresh lemon juice (from 4 - 5 lemons)
2 sticks plus 5 tablespoons (10 1/2 ounces) unsalted butter, cut into tablespoon-size pieces, at room temperature

1 9-inch tart shell made with Sweet Tart Dough (recipe follows)

GETTING READY: Have an instant-read thermometer, a strainer and a blender (first choice) or food processor at hand. Bring a few inches of water to a simmer in a saucepan.

Put the sugar and zest in a large heatproof bowl that can be set over the pan of simmering water. Off the heat, rub the sugar and zest together between your fingers until the sugar is moist, grainy and very aromatic. Whisk in the eggs, followed by the lemon juice.

Set the bowl over the pan, and start stirring with the whisk as soon as the mixture feels tepid to the touch. Cook the lemon cream until it reaches 180 degrees F. As you whisk—you must whisk constantly to keep the eggs from scrambling—you'll see that the cream will start out light and foamy, then the bubbles will get bigger, and then, as it gets closer to 180 degrees F, it will start to thicken and the whisk will leave tracks. Heads up at this point—the tracks mean the cream is almost ready. Don't stop whisking or checking the temperature, and have patience—depending on how much heat you're giving the cream, getting to temp can take as long as 10 minutes.

As soon as it reaches 180 degrees F, remove the cream from the heat and strain it into the container of the blender (or food processor); discard the zest. Let the cream stand, stirring occasionally, until it cools to 140 degrees F, about 10 minutes.

Turn the blender to high (or turn on the processor) and, with the machine going, add the butter about 5 pieces at a time. Scrape down the sides of the container as needed as you incorporate the butter. Once the butter is in, keep the machine going—to get the perfect light, airy texture of lemon-cream dreams, you must continue to blend the cream for another 3 minutes. If your machine protests and gets a bit too hot, work in 1-minute intervals, giving the machine a little rest between beats.

Pour the cream into a container, press a piece of plastic wrap against the surface to create an airtight seal and refrigerate for at least 4 hours or overnight. (The cream will keep in the fridge for 4 days and, or tightly sealed, in the freezer for up to 2 months; thaw it overnight in the refrigerator.)

When you are ready to assemble the tart, just whisk the cream to loosen it and spoon it into the tart shell. Serve the tart, or refrigerate 'until needed.


Fresh Orange Cream Tart

Baking From My Home to Yours by Dorie Greenspan

1 cup sugar
Grated zest of 3 oranges
Grated zest of 1 lemon
4 large eggs
Scant 3/4 cup fresh blood-orange juice or Valencia orange juice
3 tbsp fresh lemon juice
1 1/4 tsp unflavored gelatin
1 tbsp cold water
2 3/4 sticks (11 ounces) unsalted butter, cut into tablespoon-size pieces, at room temperature

1 9-inch tart shell made with Sweet Tart Dough (recipe follows)

3 orange segments, for decoration
1/3 cup quince or apple jelly mixed with ½ tsp of water, for glazing

GETTING READY: Have an instant-read thermometer, a strainer and a blender (first choice) or food processor at hand. Bring a few inches of water to a simmer in a saucepan.

Put the sugar and orange and lemon zest in a large heatproof bowl that can be set over the pan of simmering water. Off the heat, rub the sugar and zests together between your fingertips until the sugar is moist, grainy and very aromatic. Whisk in the eggs, followed by the orange and lemon juice.

Set the bowl over the pan, and start stirring with the whisk as soon as the mixture feels tepid to the touch. Cook the lemon cream until it reaches 180 degrees F. As you whisk—you must whisk constantly to keep the eggs from scrambling—you'll see that the cream will start out light and foamy, then the bubbles will get bigger, and then, as it gets closer to 180 degrees F, it will start to thicken and the whisk will leave tracks. Heads up at this point—the tracks mean the cream is almost ready. Don't stop whisking or checking the temperature, and have patience—depending on how much heat you're giving the cream, getting to temp can take as long as 10 minutes.

As soon as it reaches 180 degrees F, remove the cream from the heat and strain it into the container of the blender (or food processor); discard the zest.

Soften the gelatin in the cold water, then dissolve it by heating it for 15 seconds in a microwave oven (or do this in a saucepan over extremely low heat). Add the gelatin to the filling and pulse once just to blend, then let the filling cool to 140 degrees F, about 10 minutes.

Turn the blender to high (or turn on the processor) and, with the machine going, add the butter about 5 pieces at a time. Scrape down the sides of the container as needed as you incorporate the butter. Once the butter is in, keep the machine going—to get the perfect light, airy texture of lemon-cream dreams, you must continue to blend the cream for another 3 minutes. If your machine protests and gets a bit too hot, work in 1-minute intervals, giving the machine a little rest between beats.

Pour the cream into a container, press a piece of plastic wrap against the surface to create an airtight seal and refrigerate for at least 4 hours. (The cream can be refrigerated, tightly covered, for up to 5 days and, or frozen for up to 2 months; thaw it overnight in the refrigerator.)

When you are ready to construct the tart, whisk the cream vigorously to loosen it. Spread the cream evenly in the crust. Arrange the orange segments in the center of the tart and prepare the glaze: bring the water and jelly to a boil. Use a pastry brush or a pastry feather to lightly spread the jelly over the orange segments and cream. Serve now or refrigerate the tart until needed.

Sweet Tart Dough
Baking From My Home to Yours by Dorie Greenspan

1 1/2 cups all-purpose flour
1/2 cup confectioners’ sugar
1/4 tsp salt
1 stick plus 1 tablespoon (9 tablespoons) very cold (or frozen) unsalted butter, cut into small pieces
1 large egg yolk

Put the flour, confectioners' sugar and salt in a food processor and pulse a couple of times to combine. Scatter the pieces of butter over the dry ingredients and pulse until the butter is coarsely cut in—you should have some pieces the size of oatmeal flakes and some the size of peas. Stir the yolk, just to break it up, and add it a little at a time, pulsing after each addition. When the egg is in, process in long pulses—about 10 seconds each—until the dough, which will look granular soon after the egg is added, forms clumps and curds. Just before you reach this stage, the sound of the machine working the dough will change—heads up. Turn the dough out onto a work surface and, very lightly and sparingly, knead the dough just to incorporate any dry ingredients that might have escaped mixing.

TO PRESS THE DOUGH INTO THE PAN: Butter a 9-inch fluted tart pan with a removable bottom. Press the dough evenly over the bottom and up the sides of the pan, using all but one little piece of dough, which you should save in the refrigerator to patch any cracks after the crust is baked. Don't be too heavy-handed—press the crust in so that the edges of the pieces cling to one another, but not so hard that the crust loses its crumbly texture. Freeze the crust for at least 30 minutes, preferably longer, before baking.

TO PARTIALLY OR FULLY BAKE THE CRUST: Center a rack in the oven and preheat the oven to 375 degrees F.
Butter the shiny side of a piece of aluminum foil and fit the foil, buttered side down, tightly against the crust. (Since you froze the crust, you can bake it without weights.) Put the tart pan on a baking sheet and bake the crust for 25 minutes. Carefully remove the foil. If the crust has puffed, press it down gently with the back of a spoon. For a partially baked crust, patch the crust if necessary, then transfer the crust to a cooling rack (keep it in its pan).

TO FULLY BAKE THE CRUST: Bake for another 8 minutes or so, or until it is firm and golden brown. (I dislike lightly baked crusts, so I often keep the crust in the oven just a little longer. If you do that, just make sure to keep a close eye on the crust's progress—it can go from golden to way too dark in a flash.) Transfer the tart pan to a rack and cool the crust to room temperature before filling.

TO PATCH A PARTIALLY OR FULLY BAKED CRUST, IF NECESSARY: If there are any cracks in the baked crust, patch them with some of the reserved raw dough as soon as you remove the foil. Slice off a thin piece of the dough, place it over the crack, moisten the edges and very gently smooth the edges into the baked crust. If the tart will not be baked again with its filling, bake for another 2 minutes or so, just to take the rawness off the patch.

Pin It!