Showing posts with label bread. Show all posts

Friday, February 11, 2011

Homemade Pretzels with Cheese Sauce

I know I'm late to the party as talking about Superbowl food and stuff is sooooo last week (Yay Packers, by the way!) but, even though I made these pretzels for the event in question, I want to make sure they don't stay labeled as "party food". No, in fact I think you should make these any time, special event or not.

First, they are really easy to make, just like making bread. Second, they're impressively tasty, think bagels but with a fun shape factor. And third, they are endlessly adaptable: they could be salty, sweet, with sesame or poppy seeds, served with a cheesy sauce or an onion dip, or even, oh my, with a cinnamon coating and served with a cream cheese dip! I just thought of that one, I might have to make some this weekend!


Homemade Pretzels
adapted from Chuck Hughes via Food Network Canada

1 1/2 cups warm water (between 110F and 115F)
1 tbsp granulated sugar
2 tsp active dry yeast
3 cups all purpose flour
2 tsp kosher salt
2 tbsp melted butter

10 cups water
2/3 cup baking soda
Egg wash: 1 egg, beaten with 1 tsp water
Coarse salt, sesame seeds, your choice of toppings

Lightly oil a large bowl and set aside.

In a measuring cup, combine warm water, sugar and active dry yeast. Allow to sit 5 minutes so the yeast can start doing its thing. In a large bowl, mix the flour and salt. Once the yeast mixture starts to foam, add the melted butter and pour into the flour mixture. Using a wooden spoon, start mixing the dough until it comes together. Place the dough onto a lightly floured surface and knead for about 5 minutes, adding flour as necessary to obtain a smooth ball of dough. Place the ball of dough in your previously oiled bowl, cover with plastic wrap and leave to rise in a warm place until the dough has doubled in size, about one hour.

Once your dough has risen, line a baking sheet with parchment paper and oil it lightly. Take the dough out of the bowl and divide it into 12 equal pieces. Roll each piece of dough into an approximately 20-inch rope. Make a U shape with the rope, holding the ends of the rope, cross them over each other and press onto the bottom of the U in order to form the classic pretzel shape. Proceed that way with each of the 12 pieces of dough and place the pretzels on the baking sheet and refrigerate for one hour. This step allows the surface of the pretzels to dry and makes them easier to handle.

Preheat the oven to 450F.

In the largest pot you have, bring the 10 cups of water to a boil. Once the water is boiling, add the baking soda, very carefully, a little bit at a time, as it will cause the water to boil over.

Place the pretzels in the boiling water, one at a time, 30 seconds each. Remove the pretzels from the water with a large spatula and place them back on the parchment lined baking sheet. The boiling step will help the pretzels get that signature brown, crunchy exterior.

Brush the top of each pretzel with the egg wash, sprinkle with your topping of choice and bake in the preheated oven for about 12 minutes, until the pretzels get that dark golden brown we're looking for. Transfer the pretzels to a cooling rack and let rest 5 minutes before serving.

Note: If you're not sure you're going to eat your pretzels all in the same day, may I suggest you omit sprinkling them with salt. The salt will make them soggy the next day.

Cheese Sauce
adapted from Ricardo Magazine

1 tbsp cornstarch
1 (370 ml) can of evaporated milk
2 tbsp olive oil
1 onion, finely chopped
1/2 green bell pepper, finely chopped
1 garlic clove, finely minced
1 tbsp tomato paste
1 tbsp ground smoked chipotle pepper
2 cups grated sharp cheddar cheese, preferably orange
Salt and pepper, to taste

In a bowl, whisk the cornstarch and evaporated milk together; set aside.

In a saucepan, heat the olive oil and add the onion, bell pepper and garlic. Sauté until softened, about 5 minutes. Add the tomato paste and smoked chipotle pepper and cook for another minute. Add the evaporated milk mixture and bring to a boil, whisking constantly. Simmer for about 2 minutes. Add the grated cheddar and whisk until the cheese is melted and the sauce is smooth. Add salt and pepper to taste and serve warm with the pretzels.

Note: This sauce is terrific in burgers as well. And if you have any leftovers, you can make a great quickie mac 'n cheese with it the next day.


Pin It!

Tuesday, December 7, 2010

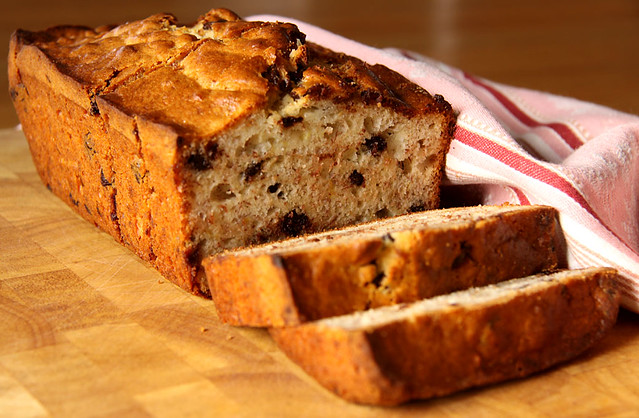
Most Ordinary/Extraordinary Banana Bread

Aaaaah! You guys! I miss my blog so much! I know by now I should be posting Holiday appropriate recipes and photos with backgrounds-full of lit-up Christmas trees and decorations but you know what? I'm not there yet. Soon, very soon, but for now, I will share with you my most ordinary/extraordinary recipe.

Ordinary because, really, does the internet need yet another banana bread recipe? No, probably not. But also extraordinary because it is the only one in my repertoire that I know by heart, that I go to almost every week and also, because we all love it, all 5 of us. So I thought it was time that it got the respect it deserves and a rightful place alongside the other banana bread recipes floating about the web.


Ordinary/Extraordinary Banana Bread

1 3/4 cups all-purpose flour
2 tsp baking powder
1/2 tsp salt
1/4 tsp baking soda
1 egg
1/3 cup canola oil
2/3 cup granulated sugar
3 medium bananas, mashed (about 1 cup)
1 tbsp lemon juice
1/2 cup semi-sweet or milk chocolate chips

Preheat your oven to 350F. Grease a 9 x 5 inch loaf pan and set aside.

In a bowl, mix flour, baking powder, salt and baking soda; set aside.

In a large bowl, mix the egg, oil and granulated sugar. Mix the lemon juice with the mashed bananas. Add the dry ingredients to the egg mixture alternately with the bananas, starting and ending with the dry ingredients. Fold in the chocolate chips. Pour the batter into the greased loaf pan and bake in preheated oven for 60 to 70 minutes, until a skewer inserted in the center of the bread comes out clean. Invert onto a wire rack and let cool completely.
Pin It!

Friday, October 23, 2009

The Knead to Bake

I know, I know, corny title, but I just couldn't resist. I woke up one morning last week and I just needed to bake bread. I was literally obsessed with it. Am I the only one this happens to? Anyways, I started looking for a recipe that wouldn't be complicated but still good and to which I had all the ingredients.

I found this Buttermilk Honey Bread on Rosa's Yummy Yums, via Food Blog Search (I just love that site) and it was perfect! There is just something so satisfying about bread baking. You start with next to nothing and end up with a fragrant little miracle! The first time around, I made three small braided loaves; one went to a friend and the other two loaves didn't last very long, we devoured them!

The weather has gotten quite cold very quickly around here, we even had snow yesterday. So I decided to make the bread again, I certainly can't think of a better thing to do on a cold day than bake! This time I followed the original recipe and made two braided loaves. We'll have some fresh bread tonight with dinner, whatever that might be...

Visit Rosa for the recipe (she has it in English and in French!) and have a great weekend!

EDIT: I just noticed when I was uploading my pics to Flickr that in the post, the photos look dull compared to what they look like in Flickr. Does this happen to anyone else? Is there a way to remedy this? Thanks for your input!
Pin It!

Tuesday, April 21, 2009

TWD - Four Star Chocolate Bread Pudding

I've always thought of bread pudding as one of the most perfect of comfort foods but I'd never have thought to pair it with chocolate. It's usually cinnamon, raisins, cranberries, pecans and such for me. But thanks to Lauren of Upper East Side Chronicle (A Baking Blog), and Dorie, of course, I now know the joys of Chocolate Bread Pudding.

As I usually do for bread pudding, I didn't just use stale bread, I used stale cinnamon rolls from this little coffee shop we go to sometimes. The hint of cinnamon went really well with the chocolate, it gave it even more depth. And the richness of the cinnamon rolls made this even more sinful than it already was! Just as last week's Chocolate Amaretti Torte though, this recipe is for the serious chocolate lover. I paired it with a light fruit salad, for color and contrast.

I'm sure all the other Tuesdays with Dorie bakers have many surprises in store for us this week in the way of fantastic bread pudding variations. So with that, please check out Lauren's blog for the Chocolate Bread Pudding recipe and may you all have a fabulously chocolaty day!


Pin It!

Tuesday, November 11, 2008

Tuesdays With Dorie - Kugelhopf

I'm having a hard time writing this post as I have mixed feelings about my kugelhopf. Yolanda, of The All-Purpose Girl, chose the kugelhopf for this week's Tuesdays with Dorie and I was so happy about it. I've wanted to try making one for a while now and we all know having an excuse to buy a new pan is always fun. I looked for a kugelhopf pan everywhere and finally found one last Saturday. I was even happier as my Mom was visiting and I would be able to share it with her.


Saturday night, I made the kugelhopf dough with my KitchenAid (really, I couldn't deny my best friend its little happy dance!), put it in the fridge, slapped it down a few times and went to bed. On Sunday morning I let it rise to the top of the pan, baked it, soaked it in butter (butter!) sprinkled sugar over it and then it was all we could do to wait for it to cool to room temperature before digging in. It was simply fabulous. Light, airy, buttery, delicious. Only problem is I got no pics. Not one. It was raining, I had no light and no desire to wait for it! So I decided to make another kugelhopf. I gave the remainder of the first one to Mom so she could take some to my Dad so, really, what was stopping me?

Martin suggested I add some orange zest and a few more golden raisins and I agreed it would be a nice addition. So, Sunday night, I started on another batch of dough. Easy-peasy, right? Oh, no, not easy at all. The dough just wouldn't come together in my KitchenAid. It was slippery, like there wasn't enough flour. I'm thinking now that maybe my butter was too soft. Could it be? Anyways, I added a few tablespoons of flour to get the dough together. Then it just climbed up around the top part of the hook and didn't slap the sides of the bowl at all. I just stopped the mixer, kneaded it by hand a few minutes and put it in a bowl to rise. The first rise went fine, the dough was then refrigerated and slapped down a few times and let to rest in the fridge overnight. The next morning, I put it in the pan, left it to rise and... it didn't. Well, it did, a little but not nearly as much as my first. And then it didn't rise AT ALL in the oven. Not one bit! That's never happened before, never. Hmpf. Anyhoo, I ended up with a way shorter second kugelhopf.

It tastes fine, although it's not as light and airy as the first (probably because of those few tablespoons of flour I added). The orange zest is a great idea though, I'm keeping that. I haven't said my last word. I have the pan, I'll be baking another kugelhopf sometime soon. If you'd like to make a kugelhopf, Yolanda has the recipe on her blog. And please, if you do try it, come back and tell me how it went, OK? In the meantime, check out the rest of the Tuesdays with Dorie gang, they all made the kugelhopf too. I for one can't wait to see everyone's!
Pin It!

Friday, April 18, 2008

Ployes for A Taste of Yellow

It is, obviously, my first time participating in A Taste of Yellow, an event to Support LiveSTRONG Day, hosted and created by Barbara of Winos And Foodies. I thought long and hard about the recipe I would be making for the event. I wanted to make a dish that meant something to me, something traditional. And then it hit me: ployes. These griddle cakes are just the right color and I’ve been eating them for as long as I can remember.

Just for the fun of it, I googled ployes to see if I could find anything about them on the net. I was stunned to find recipes for ployes on Food Network Canada, RecipeZaar and various other recipe sites! No two recipes are exactly the same and that’s the way it has always been. There might be as many ways to make ployes as there are people who make them! They can go from thick and crumpet-like to thin as a crêpe, it all depends on who’s at the stove! The shade of yellow the ployes will be depends on the brand of flour and baking powder used to make them. Once, my dad couldn't find his usual brand of baking powder and ended up with bright orange ployes!

My paternal grandmother was a cook in a logging camp when my dad was a small boy and she would make these buckwheat pancakes everyday for the loggers. They’re a tradition in Edmundston New Brunswick, and often served with baked beans, cretons (which is a meat spread), molasses or brown sugar. You can also have a taste at La Foire Brayonne, a yearly fair featuring music, arts and crafts, food, and all sorts of activities. My son and daughter love ployes (the wee one hasn’t tasted them yet!), they even eat them for breakfast with Nutella, but that’s not traditional at all!

So there you have it folks, ployes for A Taste of Yellow. A traditional, comforting family favorite for all our loved ones out there who fight cancer every day.

Ployes (Buckwheat Pancakes)

These are traditionally cooked on a cast iron skillet but an ordinary skillet would do as well. Just make sure not to turn them over when cooking. You’ll know they’re cooked when the surface is dotted with bubbles and dry to the touch. If you find the batter is too thick, just add water until the batter is to your liking.

1 ½ cups of buckwheat flour
1 ½ cups all purpose flour
1 tsp salt
2 tsp baking powder
3 cups of warm water


Mix together dry ingredients. Add water and mix well, incorporating as much air as possible (that will help with the bubbles!). The consistency of the batter should not be too thick so add water if necessary. Spoon batter onto a hot skillet. Cook until the bottom is a little crispy and the top is dotted with bubbles and dry to the touch, you shouldn’t need to turn the ployes. Serve warm with butter or anything else you’d like to try them with!

EDIT: It's been brought to my attention that the brand of baking powder used might affect the color of your Ployes. I've always used Magic brand baking powder. Hope this helps!

Pin It!

Friday, February 15, 2008

Au Naturel

What kind of food blogger would I be if I didn’t at least once talk about the wonder that is THE No-Knead Bread?

More than a year and a half ago, the NY Times published an article about a “truly minimalist breadmaking technique” thought up by Jim Lahey of Sullivan Street Bakery in Manhattan. I wonder if Mr. Lahey ever imagined that his recipe (and baking process) would create such a buzz around bread baking? Did he ever think that people would buy Dutch ovens for the sole purpose of baking his no-knead bread? Could he have known that countless blog posts would be flooded with comments and questions about this “revolutionary process” and turn non-bakers into bread baking gods? I’m exaggerating, ever so slightly, here but you all know what I’m talking about.

The first no-knead bread I baked was a year ago, in January 2007, after seeing Deb’s post about the bread at Smitten Kitchen. As many a person had done before me, I hesitated to make the bread because of the “put room temperature dough in a really hot pot” direction; I was afraid my pot would crack because of the temperature variation. But then I decided to try it anyway since the only Dutch oven I have is an old 4-quart oval Vision Ware my mom gave me. You know, those brown Pyrex dishes that were all the rage in the 90’s, well, my Mom got a whole set. If it did break during the cooking process, that could be my excuse to get a new Dutch oven (woohoo!). But, it didn’t break and what I got, instead of a brand new Dutch oven, was the most incredible loaf of bread I had ever baked in my life. I couldn’t believe the crust was so crunchy, it actually crackled while cooling (I am aware a number of other bloggers have noted this but I don’t care, I’m late with this post anyway)! The crumb’s texture was incredible, it was moist and flavorful.

After that first loaf, I went a little nuts and tried “a few” variations: Cranberry-Orange, Chocolate-Raisin, Multi-Grain, different types of flour… I’m telling you, this recipe is so adaptable, you could do pretty much anything you want with it except mess it up! I have to admit though, my favorite “variation” is closest to the original as possible, “au naturel” you might say, strait out of the oven, with steam coming out of the moist, warm bread. I still use the no-knead recipe regularly, especially when I need something to bring to a dinner party. I always get the same reaction: “You MADE that bread yourself!?”. So, if you’ve been on another planet for the last year and a half, or just afraid to ruin your only Dutch oven, here’s your chance to try this recipe! Better late than never…

And since this month's CLICK event theme is flour, the photo at the top of this post is my entry! Head on over to jugalbandi to see the other entries.

No-Knead Bread
Adapted from Jim Lahey, Sullivan Street Bakery

Time: About 1½ hours plus 14 to 20 hours’ rising

3 cups all-purpose or bread flour, more for dusting
¼ teaspoon instant yeast
1 1/2 teaspoons salt
Flour, wheat bran or cornmeal for dusting, as needed

In a large bowl combine flour, yeast and salt. Add 1 5/8 cups water, and stir until blended; dough will be shaggy and sticky. Cover bowl with plastic wrap. Let dough rest at least 12 hours, preferably about 18, at warm room temperature, about 70 degrees.

Dough is ready when its surface is dotted with bubbles. Lightly flour a work surface and place dough on it; sprinkle it with a little more flour and fold it over on itself once or twice. Cover loosely with plastic wrap and let rest about 15 minutes.

Using just enough flour to keep dough from sticking to work surface or to your fingers, gently and quickly shape dough into a ball. Generously coat a sheet of parchment paper with flour, wheat bran or cornmeal; put dough seam side down on parchment paper and dust with more flour, bran or cornmeal. Cover with a kitchen towel and let rise for about 2 hours. When it is ready, dough will be more than double in size and will not readily spring back when poked with a finger.

At least a half-hour before dough is ready, heat oven to 450 degrees. Put a 4- to 8-quart heavy covered pot (cast iron, enamel, Pyrex or ceramic) in oven as it heats. When dough is ready, carefully remove pot from oven. Slide your hand under parchment paper and turn dough over into pot, seam side up; it may look like a mess, but that is O.K. Shake pan once or twice if dough is unevenly distributed; it will straighten out as it bakes. Cover with lid and bake 30 minutes, then remove lid and bake another 30 minutes, until loaf is beautifully browned. Cool on a rack.

Yield: One 1½-pound loaf.

Pin It!